
In short
- An external flash changes photography more than a new lens: light from above, from the side, reflected, under control instead of the flat frontal light of the built-in flash.
- The guide number (GN) measures power: GN 36 at ISO 100 is sufficient for 90% of indoor situations up to 5 meters.
- Automatic TTL to start and for events, manual for portraits and repeatable setups. Learning both requires 2-3 months of real practice.
- A dedicated compatible flash (Godox, Nissin, Yongnuo) costs 80-200 euros new and covers 95% of what a 500 euro original Canon or Sony flash does.
The first external flash I mounted on my camera, twenty years ago, changed the way I photograph more than any lens I have bought since. Not because it provided more light, but because I could finally decide where the light came from. That small step — detaching the flash from the camera body, aiming it at the ceiling, shaping the shadows — is the real difference between a photo that looks like it was taken with a mobile phone and one that looks like it was taken by someone who knows what they are doing.
In this guide, I explain how an external flash works, which parameters truly matter when choosing one, how to use it in the most common situations, and the mistakes I most often see beginners make when they walk into the shop. No useless physics theory: just what you need to go from the built-in flash to a sensible used flash without wasting €300 on something that will end up in a drawer.
Why the built-in flash is not enough (almost never)
The pop-up flash on your DSLR or mirrorless camera is designed to get you out of a pinch, not to take great photos. You'll see it in the first serious shot: flat faces, red eyes, a hard black shadow on the wall behind the subject, and a completely dark background just three meters away. It's not your fault and it's not the camera's fault. It's physics.
The front light issue
When light comes from the same direction as the lens, the face loses three-dimensionality. Shadows are what give volume: the nose casting a small shadow on the cheek, the cheekbone separating from the temple, the chin detaching from the neck. With the built-in flash, all the light comes from twenty centimeters above the optical axis and erases these micro-shadows. The result is the classic ID photo face: flat, shiny, without depth.
There is also a secondary but annoying issue. The strong frontal light hits the retina perpendicularly, and the blood vessels reflect red. These are red eyes. The camera's red-eye reduction mode fires pre-flashes to make the pupil close, but it slows the shutter count by a good second. Meanwhile, the subject has stopped smiling.
Note that the built-in flash drains the camera battery much faster than usual. At a one-hour event with 200 shutter count, you will see the battery drop by 40% just from the flashes.
Shutter count: what it really means
The Guide Number (GN) is the standard way to measure flash power. It is expressed at ISO 100 with a 50mm lens. The practical formula is simple: useful distance in meters = GN ÷ aperture. With GN 12 and an aperture of f/4, you get good illumination up to 3 meters. Beyond that, the light falls off.
- Built-in flash: GN 10-12. Effective range at f/4 and ISO 100 → approx. 2.5-3 meters. At 4 meters, the photo is already underexposed.
- Entry-level external flash: GN 36-40. Same aperture, effective range approx. 9-10 meters. Triples the coverage.
- Top-tier external flash: GN 58-60. Power reserve that allows you to stop down to f/8, bounce off the ceiling losing 2-3 stops, and still have sufficient light.
The practical difference is not just "seeing further." With a high GN, you can afford to waste light by pointing the flash head towards the ceiling or a side wall, where it bounces before returning to the subject. This is exactly what a built-in flash can never do: its head is fixed forward.
Anatomy of an external flash: what to look for before buying
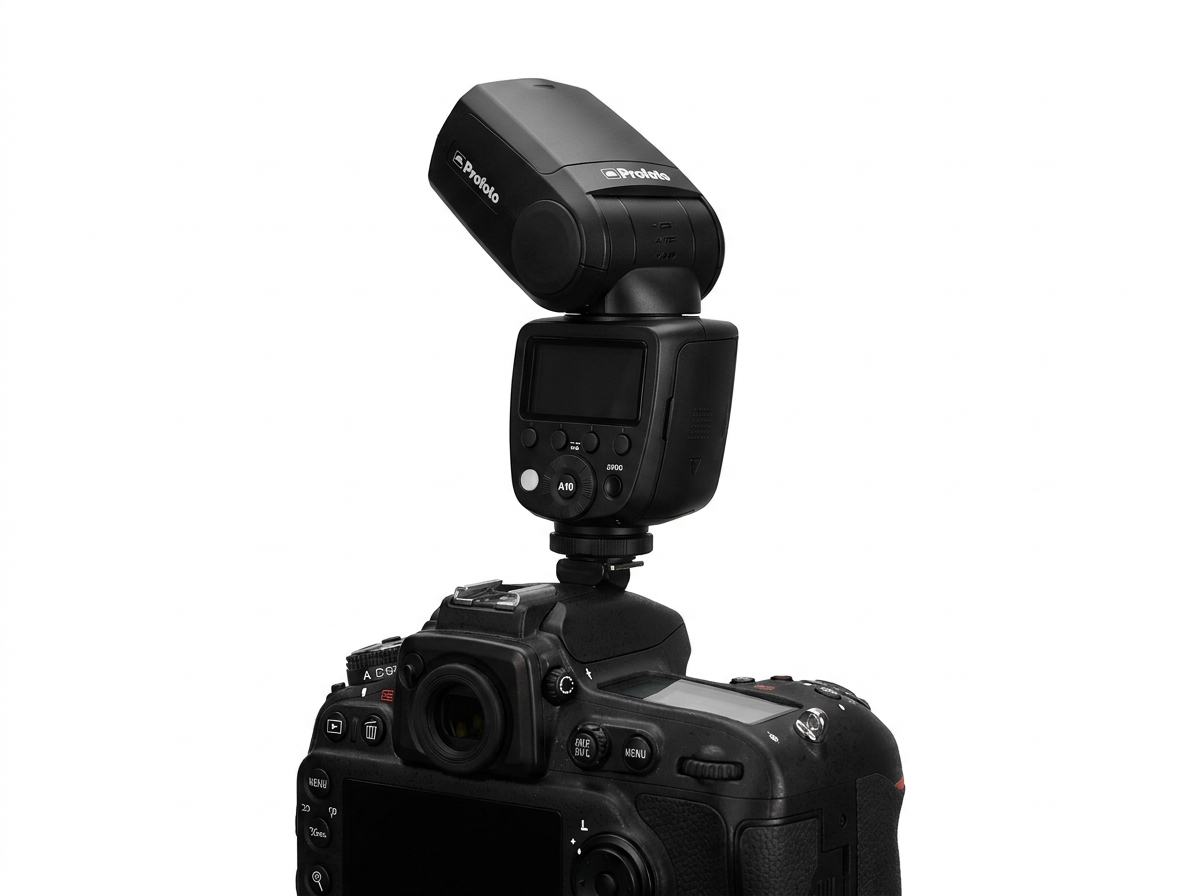
Before looking at the price, pick up the flash and try to move the head. If it doesn't rotate or tilt, leave it where it is: it's a front flash in disguise. Everything else — TTL, HSS, lithium battery — comes after this basic check that almost no one does in-store.
Tilt and swivel screen
The head is the reason you buy an external flash. Without the ability to aim it elsewhere than the subject, you are paying 150 euros to do what the built-in pop-up does, just with more power.
The minimum specifications to expect:
- Horizontal rotation: at least 180° to the left and 90° to the right. Essential for bouncing light off a side wall when your subject is in portrait orientation.
- Vertical tilt: from -7° (for short-throw macro) up to 90° upwards. Without ceiling bounce, you lose 80% of useful indoor scenarios.
- Defined shutter count stops: the head must lock into precise positions and not slip under the weight of the modifier.
Very cheap entry-level flashes (under 50 euros new) often only rotate on one side or do not tilt at all. That is where the savings become a trap.
TTL, manual and HSS
Three acronyms, three different working modes. Knowing when to switch from one to the other is half the job.
- TTL (Through The Lens): the camera measures the scene, fires a pre-flash, calculates the exposure, and tells the flash how much light to emit. Useful for weddings, parties, and moving children — situations where you don't have time to think.
- Manual: you set the power in fractions (1/1, 1/2, 1/4 up to 1/128). Once you find the right exposure, every shutter count will be identical. Essential for studio portrait and still life.
- HSS (High Speed Sync): allows you to sync the flash at speeds faster than 1/250s. Needed when you want to shoot at f/1.8 in full sun at 2 PM without blowing out the background.
A flash without HSS costs less but rules out daytime fill-flash. For an extra 30-40 euros, it's worth it.
Power supply: AA batteries or lithium battery
Rechargeable eneloop AA batteries are the classic choice: they cost 15 euros for four, can be recharged a thousand times, and are even available at the supermarket on Saturday evening. Flash recharge time at full power: approximately 4 seconds.
Modern flashes with integrated lithium batteries (Godox V1, Godox V860III) recharge in 1.5 seconds and deliver 600 full-power shots on a single charge. You feel the difference at weddings, when you need to follow the rice toss without missing the good shot. The downside: if the battery dies away from home, you're stuck.
Compatibility: the flash must speak your camera's language
A Canon flash mounted on a Sony turns on, flashes, and illuminates the scene. But it does not communicate with the camera: no TTL, no HSS, no intelligent synchronization. It becomes an expensive manual flash. This is why the flash must be dedicated to your camera system, or compatible with that specific system.
The issue is not the physical hot shoe — that is nearly standard ISO 518 — but the communication pins surrounding the central contact. Each manufacturer uses a proprietary protocol to exchange exposure, distance, and power information between the camera body and the flash.
The five main systems
The five TTL systems you can find on the used market are as follows, each with its own protocol:
- Canon E-TTL II: used by all EOS DSLR and RF/EF-M mirrorless cameras. Proprietary pins around the central contact.
- Nikon i-TTL: DX/FX DSLR and Z mirrorless cameras. Incompatible with Canon despite the identical physical hot shoe.
- Sony Multi Interface Shoe (MI): from 2012 onwards. Pre-2012 Sony cameras (first-generation NEX) had the old proprietary non-MI mount, which is now practically obsolete.
- Fujifilm TTL: X and GFX series. Physically standard hot shoe, but with its own TTL protocol.
- Micro 4/3: Olympus and Panasonic share the same TTL standard, so an Olympus flash works in TTL mode on Panasonic and vice versa. This is the only case of real cross-compatibility.
All systems maintain "dumb" compatibility on the central hot shoe: a universal manual flash (like an old Vivitar 285) will fire on any camera, but you lose automation features and in some cases risk sending 200V into the circuits of a modern mirrorless body. Always verify the trigger voltage before mounting 1980s flashes on digital camera bodies.
Practical examples with real camera bodies
Let's see what each one has, starting with cameras we have in store today:
- The Canon EOS RP at 600 euros requires E-TTL II flash: original Canon Speedlites, or Godox TT685C/V860III-C, Yongnuo YN568EX III. The final C in third-party models indicates the Canon version.
- The Sony A6100 at 600 euros and the Sony ZV-E10 at 500 euros both feature the Multi Interface Shoe. Look for flashes with the "S" designation (Godox V860III-S, TT350-S) or original Sony HVL.
- The Fujifilm X-T1 at 380 euros accepts Fuji EF-X flashes or dedicated third-party options (F or FT designation). A Canon flash will fit but remains manual.
- The Olympus PEN E-PL9 at 300 euros uses the Micro 4/3 system, so it accepts Olympus, Panasonic, and third-party flashes with the O or MFT designation.
If you are still evaluating the camera body before the flash, I have written a guide to choosing your first used mirrorless that helps you understand which entry-level system is worth it. Once you have chosen the body, the flash ecosystem is almost decided on its own.
The three basic techniques you need to learn right away
An external flash is of little use if you point it straight at the subject's face. The difference between a flat photo and one with real light comes down to three techniques that take ten minutes to learn and improve for years. In order: ceiling bounce, bounce with a reflector card, off-camera flash. I have seen them change the way hundreds of customers shoot, who thought they needed more expensive gear.
Bounce off the ceiling
Rotate the flash head upwards at an angle between 60 and 75 degrees. Not 90: the light would fall perpendicularly above the subject's head. At 60-75 degrees, the flash bounces off the ceiling and illuminates the subject from above in a soft manner, simulating the natural light of a large window.
It works under three precise conditions:
- White or neutral ceiling: a cream-colored ceiling creates a warm cast, while a green one ruins skin tones.
- Height under 3 meters: beyond that, the flash power is insufficient to illuminate the subject after the bounce.
- +1 stop compensation on TTL: the flash reads the bounce as a dark scene and tends to underexpose.
In a wedding hall with 4-meter ceilings or exposed dark wooden beams, bounce doesn't work. You need a different strategy there.
Bounce with white card
When you bounce off the ceiling, the light comes from above and creates shadows under the eyes, under the nose, and under the chin. These are the so-called flash shadows, the most recognizable mistake in poorly executed wedding photos.
The solution is a white card the size of a business card, integrated into most flashes over 100 euros. You pull it out from the flash head, it stays vertical, and reflects 5-10% of the flash directly forward to fill in shadows. If your flash doesn't have one, a white envelope secured with a rubber band does the same job. It costs nothing and changes the result.
Off-camera flash: the quality leap
Detaching the flash from the hot shoe is the moment you stop taking snapshots and start making photography with light. You need a TTL cable (10-20 euros, good for practical use) or a radio trigger like the Godox X2T or Yongnuo YN560-TX (50-80 euros, 30-meter coverage, more reliable).
Position the flash at 45 degrees from the subject, slightly above eye level. Achieve depth, facial modeling, and shadows that create a three-dimensional effect. Move the same flash behind the subject to create a backlight that separates the subject from the background. It is the same flash you used on the hot shoe. Only the position changes, and with it, everything changes.
TTL or manual: when to use what
Mode is not a matter of level, it is a matter of situation. An expert wedding photographer shoots in TTL for nine hours in a row without shame, and a student in their first month can work in manual if they are photographing a wine bottle on a table. The right question is not "which mode is more professional", but "how much does the scene change between one shutter count and the next".
TTL reads the light through the lens a moment before the shutter count, calculates the required power, and fires. It is fast and adapts automatically. Manual mode, on the other hand, locks the power to the value you set: if the scene remains the same, every shutter count is identical to the previous one.
When TTL saves you
Events, wedding reportages, communions, family gatherings, kids running around the living room. All the situations where the subject is moving, the distance to the flash changes every two seconds, and the ambient light doesn't wait for you.
In TTL mode, the flash recalculates its power output for every shutter count. You focus on composition and the subject's expression, while the flash handles the exposure. It is not perfect: it tends to overexpose light subjects against a dark background and underexpose the opposite, as it reads the scene based on averages.
The trick we teach customers buying their first flash in-store is simple: set a -1 stop compensation as your starting point. Almost always, the TTL fires too hot, and -1 stop brings the light back to a natural level, where the flash brightens without flattening. From there, adjust by eye, checking the first two or three shots on the display.
When manual is better
Studio portraits, product photography, still life, corporate headshots, any scene where the camera, subject, and flash remain stationary. Even a fashion setup with the model changing poses but staying on the same stool falls under manual mode.
The manual gives you repeatability. You find the right exposure once, and the subsequent 200 shutter count shots come out identical. No surprises, no light variations between one photo and the next due to TTL recalculation.
The starting point we recommend is 1/16 power, flash-to-subject distance of about two meters, ISO 200, aperture f/8. Take shots, check the histogram on the display, and adjust: if the midtones are too far to the left, increase by one stop to 1/8. If they are too far to the right, decrease to 1/32. In three or four shots you will have nailed the exposure, and from there you can work without touching the flash again.
Learning to use both requires real-world practice. Two or three months with the flash in your bag every day, not a weekend of YouTube tutorials.
Modifiers: softbox, umbrellas, diffusers
The white Sto-Fen diffuser included with many flashes does very little. It spreads the light by a few degrees, but if the flash is pointed straight at the subject, it remains hard frontal light. To truly soften the light, you need to increase the emitting surface, which is achieved with proper umbrellas or softboxes.
The physical rule is simple: the larger the light source is relative to the subject, the softer the shadows. A bare flash is a 6x4 cm source. An 80 cm umbrella opened 30 cm from the face becomes a huge source. The difference in shadows under the chin and on the sides of the nose is evident from the first shutter count.
What you need right away
An 80-100 cm translucent white umbrella costs 20-30 euros new and makes a clear difference to the result. Mount it on a budget stand (another 25-30 euros), fire your flash in off-camera mode, and you get soft, diffused light that works for portraits, still life, and product shots for online listings.
The alternative is a 60x60 cm softbox with a speedring mount for hot shoe flashes. It costs 40-60 euros, is more directional than an umbrella (less light scattered in the room), and produces a square catchlight in the eyes that many prefer. For home portraits or a small studio, it is the first serious modifier to get.
The minimum kit to get started with off-camera lighting is therefore:
- Tripod 2 meters with standard 1/4" mount: 25-30 euros
- Flash bracket with umbrella mount: 15-20 euros
- White translucent umbrella 80-100 cm or 60x60 softbox: 25-60 euros
- Radio trigger of the same brand as the flash (Godox X1, Yongnuo YN622): 30-50 euros
Total 100-160 euros for a setup that allows you to take serious portraits anywhere.
What you can return
Beauty dish, strip box, snoot, gobo, honeycomb grid: all valid modifiers, but they only make sense once you understand the fundamentals. Buying them immediately without knowing how to use them is a waste of money and just fills your drawer with accessories gathering dust.
The beauty dish delivers a specific look (fashion, editorial beauty) that a beginner doesn't need. The snoot creates a narrow cone of light useful for highlighting a detail or hair, but in practice it's only used in multi-flash setups. The strip box is for full-body portraits with edge lighting on the subject, a situation that won't come up until you work in a studio.
The honest advice is simple: get an umbrella or a softbox, use it for six months, take a hundred portraits. Once you realize you're missing something specific, then buy the targeted modifier. Before that, it's just fluff.
Which flash to buy: my recommendations by price range
After ten years behind the counter, I've seen people make mistakes when buying a flash more than with any other accessory. The issue isn't choosing between 50 models: there are three price ranges, three usage logics. Here is what I would put in my beginner brother's hands, divided by real 2026 budget.
Under 100 euros: the first flash
In this price range, there is only one name I truly recommend: Yongnuo YN560 IV at 70 euros. Guide number 58 at ISO 100, motorized zoom 24-105mm, fully tilting head, powered by 4 AA batteries. It lacks TTL and HSS: this means manual mode only and sync times up to 1/200s.
For those who are learning, it is not a limitation, but a school. Put it on a used Fujifilm X-T1 that we sell for 380 euros and learn to read light on skin instead of relying on automation. If instead you want speed for events or family, skip directly to the next tier: without TTL you miss the shutter counts that matter.
Between 100 and 200 euros: the sweet spot
This is 70% of what I sell to customers coming in for their first flash. Two models that work:
- Godox TT350 — 130 euros. Dedicated version for Canon, Sony, Nikon, Fuji and Micro 4/3. TTL, HSS up to 1/8000s, zoom 24-105mm, powered by 2 AA batteries. Weighs 200 grams, fits in a jacket pocket.
- Nissin i40 — 180 euros. More powerful than the TT350, large physical dials instead of on-screen menus. Quick to adjust on the fly during a wedding.
The TT350 is the natural choice for the lightweight mirrorless bodies in our catalog: Canon EOS RP, Sony A6100, Nikon Z30, Olympus OM-D E-M1 mark II. Balanced on the camera body, you won't feel it after two hours of use.
Over 200 euros: when it makes sense
The Godox V860III at 200 euros introduces the lithium battery: 480 full-power flashes on a single charge, with a full recharge in 1.5 seconds. The Godox V1 at 260 euros adds the round head: the light is softer, and shadows in portraits are less pronounced. These are the flashes I use when working eight hours at a wedding.
Over €400, you enter the realm of original flashes: Canon Speedlite EL-5 at €500, Nikon SB-5000 at €600, Sony HVL-F60RM2 at €700. These only make sense if you are a professional who invoices, work with pairs of natively radio-synchronized flashes, and want direct manufacturer warranty. For everything else, a Godox costs a third and does 95% of the job.
Mistakes I see most often in our shop
In ten years behind the counter, I have seen the same four mistakes repeated over and over. They cost you money, frustration, and flat photos. I list them in order of frequency so you can avoid them before walking into the store.
Oversizing the power
The customer arrives with a Canon EOS R100 or a Olympus PEN E-PL9 and asks for the most powerful flash we have. I show them an NG 60 weighing 400 grams and ask them to mount it. The mirrorless camera tilts forward, the grip becomes uncomfortable, and the hot-shoe mount is subjected to mechanical stress it is not designed to withstand over time.
Note that a full-power NG 60 depletes four AA batteries in 50-60 shots and takes 4-5 seconds to recharge. For 90% of real-world uses — indoor home settings, restaurants, house parties, and small events within 5 meters — an NG 36 performs better. It weighs half as much, recharges in 2 seconds, and lasts 200 shots on a single battery.
Always use the flash straight on the face
The tilting head exists for a reason. I see people spending 200 euros on a Godox V860III and then using it pointed straight ahead as if it were the built-in pop-up. The result is the same as the built-in flash, but more expensive.
Rotating your head 60-90 degrees toward the white ceiling transforms harsh frontal light into soft, top-down light. It changes everything in ten seconds. If you're not sure where to start, the article on used portrait lenses also explains how to match light and focal length for a natural-looking face.
Leaving TTL at zero without compensation
Automatic TTL is convenient but not objective. It tends to overexpose when the subject is wearing light-colored clothing, when there is a white wall in the background, or when a mirror or shop window reflects the flash back into the light meter. Result: blown-out faces, lost shadows, flat photos.
The solution is straightforward: set the TTL compensation to -2/3 or -1 stop as the default. If you need more light, add it on the spot. Almost all flashes have a dedicated button on the body, so you don't need to navigate the camera's menu.
Buying modifiers before knowing how to bounce
Softbox, beauty dish, octabox: customers often spend 150 euros on modifiers before learning how to bounce flash off a ceiling. Bounce is free, costs zero in accessories, and solves 80% of indoor situations. The softbox comes later, once you understand what you are truly missing.
What we check in our lab on used flashes
A used flash may look like a simple box: capacitor, xenon lamp, a few contacts. In reality, it is a component that operates at high voltages, generates significant heat, and ages unevenly. That is why every flash entering the shop goes through the workbench before being put back on sale.
The first check is on the hot-shoe contacts. These are five metal pins that communicate with the camera for TTL and HSS. If they are oxidized, bent, or worn, the flash emits light but no longer communicates with the camera body. We clean them, test them on at least two different bodies of the correct system, and verify that TTL and high-speed sync respond as specified.
The second point is the tilting head. Hinges loosen over the years, especially on flashes that have been used for weddings and hundreds of rotations. A head that does not hold its angled position falls during the shutter count and changes the light. We verify retention at 45°, 60°, and 90°, both in vertical tilt and horizontal rotation.
Then we measure the actual performance, not the one stated in the manual:
- Full-power recharge time: with fully charged new batteries, we time the complete cycle. A flash rated at 3 seconds that takes 6 has tired capacitors and should be discarded or sold at a reduced price with an explicit note.
- Color temperature stability: we fire 50 consecutive full-power flashes and measure the shift. A healthy flash stays within 200 K of the initial value. Beyond that, the xenon lamp is at end of life.
- Battery compartment: we check for traces of oxidation from the AA contacts, a classic problem with flashes left in a drawer with batteries inside for years. Oxidized contacts mean unstable connections and power that drops mid-service.
Finally, the internal electronics: we read the shutter count when the flash exposes it (some Godox and Nissin models allow this via the service menu), and inspect the capacitor for signs of bulging. A swollen capacitor is a precursor to a certain failure.
All of this is recorded in a service report that remains attached to the product. Every used flash we sell comes with our 2-year warranty, identical to that on new units. If it stops working within the first 24 months, we handle it: either repair in our workshop, replacement, or refund. No arguments and no passing the customer off to the manufacturer.
Frequently asked questions
Can I use a Canon flash on a Sony or vice versa?
Physically, yes, on many models, but you lose TTL, HSS, and automatic communication. You are left with manual mode and standard sync only. For serious use, always buy a flash dedicated to your system.
Does the external flash drain the camera battery?
No, the flash has its own power source (AA batteries or integrated lithium battery). The camera only sends synchronization signals, resulting in negligible consumption. The built-in flash, however, drains the camera body's battery.
How many shutter count does a flash produce with a set of charged batteries?
With four fully charged AA eneloop batteries and medium power (1/4 - 1/8), you can get 200-300 flashes. At full power, the number drops to 80-150. The lithium batteries in modern flashes can reach 600 flashes.
What does HSS mean and when is it really needed?
High Speed Sync allows you to use the flash at shutter speeds faster than the X-sync speed (usually 1/200 or 1/250). It is essential when you need a wide aperture in bright sunlight — for example, f/2 at noon for a blurred background. Without HSS, you are limited to slower shutter speeds and must stop down the aperture.
Does the flash ruin portraits of children or animals?
Only if used improperly, frontal and straight in the face. A flash aimed at the ceiling with bounce produces soft light indistinguishable from ambient light. For animals, it is better to avoid direct flashes in the eyes at close range.
Is it worth buying a used flash?
Yes, provided it has been checked. On a tested flash, we verify contacts, tilt mechanism, recharge times, and color stability. A used flash from a reputable brand at half the price of a new one is a great deal. From a private seller without warranty, the risk is higher.
Can I start taking serious portraits using only the built-in flash?
Honestly, no. The built-in flash produces flat frontal light and hard shadows. For portraits that are truly worth it, you need an external flash with a tiltable head, even a budget one. It is the single investment that makes the biggest difference in the quality of your photos.
Looking for a flash for your camera? Let's talk
If you have any doubts about a purchase or need advice for your specific case, contact us. We offer free advice because we are photographers first and sellers second, and because a customer who makes a bad purchase will not return to photography.
Three ways to get in touch:
- Contact form — response within 24 business hours
- WhatsApp at 342 362 3454 (messages only)
- Phone: 071 291 6347 (Mon-Fri 9-13/15-18, Sat 9-13)
And if you want to see what we have in stock right away, explore the available used gear today: every camera body is certified, comes with a 2-year warranty, and ships within 24-48 hours.
Article written by Matteo for the ReflexMania Team. Last updated: May 2026. Prices and availability refer to the time of publication.