
In short
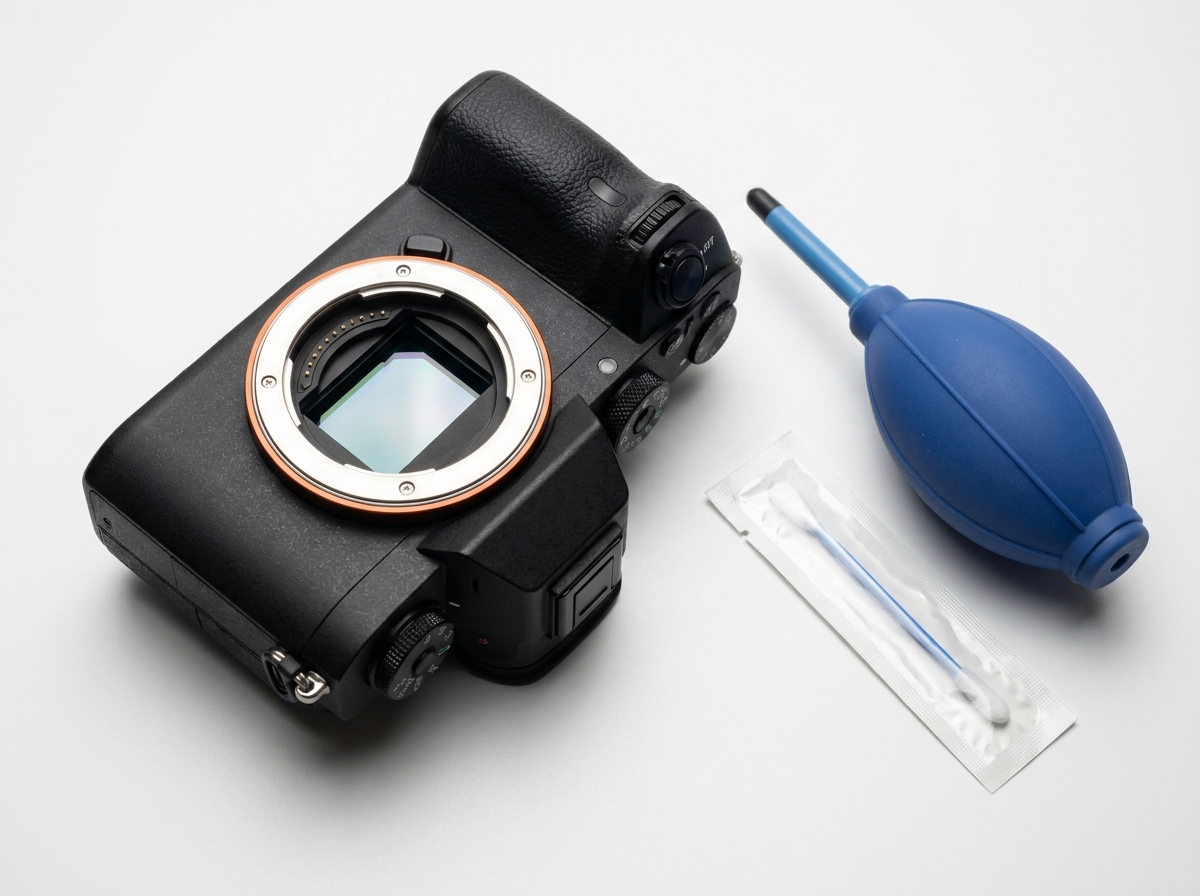
- Never touch the sensor dry with cloths or cotton swabs: use a dedicated kit with a swab of the correct size (full frame 24mm, APS-C 16mm, micro 4/3 12mm).
- Before opening any liquid, try a manual Giottos Rocket blower: in 60% of cases, dust is removed without contact.
- A wet cleaning with a swab and Eclipse fluid costs 8-12 euros in materials and takes about 5 minutes, but a single poorly removed smudge can cost you 200 euros in repair.
- At ReflexMania, we have every sensor inspected in our lab before sale: a professional cleaning costs 40-60 euros and includes shutter and diopter check.
The first time I saw a round spot in the sky of a photo, I thought it was an out-of-focus bird. It was dust on the sensor, and from that day on, I learned to recognize it in a second: f/16, white wall, and all those dark dots you don't want to see show up right on cue. Sensor cleaning is one of those things that scares you more than it should, and less than it looks in those shouted YouTube videos.
In this article, I explain how to determine if the sensor is truly dirty, when you can clean it yourself at home, and when it is better to stop and take it to a professional lab. No abstract theory: I talk about what we do every day at the ReflexMania counter with used cameras that arrive in all sorts of conditions, from a Sony A7 II used by a professional for five years to an Olympus PEN kept in a drawer.
How to tell if the sensor is actually dirty
Diagnosing before cleaning is the rule most often overlooked. Opening the sensor without verifying where the spot is located means that in 30% of cases you are cleaning something that was already clean. Dust settles on three different surfaces: the front or rear element of the lens, the optical viewfinder, and the sensor. Each behaves differently in photos, and the test explained below distinguishes them in two minutes.
The white sky test
This is the standard procedure we use in the lab when a camera body arrives for inspection. It ensures that every speck of dust on the sensor is clearly visible.
- Set aperture priority and stop down to f/16 or f/22. The more the aperture is closed, the sharper and more defined the dust shadows become.
- Switch to manual focus and turn the focus ring completely out of focus, or set it to infinity on a surface 30 cm away. You want the subject to be a uniform field, not a sharp image.
- Frame a white wall illuminated evenly, a white A3 sheet, or an overcast sky without drawn clouds. Avoid windows with curtains: the pattern complicates the inspection.
- Take the shot at base ISO, with correct exposure or slightly overexposed by half a stop.
- Open the file in Lightroom or the DSLR viewer, zoom in to 100%, and scroll through the entire image corner by corner.
Grains appear as dark, blurred spots with irregular shapes. Do not confuse them with hot pixels: those are single red or white dots, not blurs.
Dust on the sensor or lens?
This is the step that clarifies everything. Remove the lens you used for the test and mount a different one. Retake the same shutter count at f/16 on the same surface.
If the spots remain in the same position of the frame, they are on the sensor. If they change position or disappear, they were on the rear element of the first lens. Dust on the front element is barely visible at f/16 on a uniform surface: it more often manifests as a reduction in contrast or flare in backlight. Dust in the optical viewfinder of DSLRs never ends up on the files: you see it when looking through the viewfinder, but the sensor does not record it.
When to ignore and when to intervene
Not all dust warrants intervention. One or two faint spots at the edges of the frame, visible only at f/16 or f/22, can be removed in post in ten seconds with the healing brush. It is not worth the risk of a cleaning.
Step in when you find dozens of spots distributed across the entire frame, or when the spots are visible even at f/8 or wider. That is structural dirt that post-processing cannot handle without consuming hours of your time. Even a single large, distinct spot in the center warrants cleaning: in a portrait with a sky background, you will always see it.
Built-in automatic cleaning: what it really does
The self-cleaning system you hear vibrating at startup is a piezoelectric plate in front of the sensor that oscillates at frequencies between 30,000 and 70,000 Hz to shake off dust. It works, but it is not magic: it dislodges dry, light particles and does not touch anything that is wet, oily, or sticky. Understanding what to expect from this system prevents you from opening the camera body unnecessarily or, worse, from trusting it when a proper cleaning is required.
Olympus, Panasonic and true ultrasonic
Micro 4/3 systems are the most effective on the market, and I say this with data from our lab: on an Olympus PEN E-PL9 at 300 euros or a Panasonic GH5 at 470 euros, the f/22 test after five self-cleaning cycles shows practically clean sensors in 90% of cases. Olympus was the first in 2003 with the SuperSonic Wave Filter and has a twenty-year technical advantage. The filter vibrates at 30,000 Hz, dust falls onto an adhesive strip under the sensor and stays there. Dry dust from lens changes: almost always resolved without manual intervention.
Sony, Canon, Nikon: variable effectiveness
The story changes here. The Sony A7 Mark II we sell for 550-580 euros has a notoriously weak system: lower frequency vibration, no adhesive strip, and the 5-axis stabilized sensor is already somewhat "floating" by nature. Three out of ten customers bring it to us for cleaning within the first year. The Canon EOS RP at 600 euros and mid-range Nikon Z models do a decent job with ambient dust, nothing more. For all these systems, the hard rule applies:
- Light dry dust: the self-cleaning mechanism removes it in 60-80% of cases.
- Fine dust stuck by humidity: effectiveness drops to 20%.
- Fatty splashes, oily residues, shutter lubricant remnants: zero. A damp swab is required.
- Seasonal pollen: depends on the type; some stick and do not move.
When to enable it and when to disable it
The most sensible setting is "on power off": dust settles downward when you place the camera in your bag and is not recirculated upon the next power-on. Enabling it on power-on as well doubles the system's consumption without any real benefits. Disabling it entirely only makes sense in two cases: if you hear strange metallic noises after a drop, as vibration could worsen an already damaged component; or if you work in environments with abrasive dust (sand, sawdust) where the filter's movement risks dragging hard particles across the surface. In all other scenarios, let it work. It doesn't solve 100% of cases, but 60% automatic cleaning still means 60% fewer manual cleanings.
The minimum kit to clean the sensor at home
With 60-80 euros of supplies, you can perform professional wet cleaning for the next five years. Under 30 euros, you are buying products that cause more damage than they clean. This is one of those areas where false savings come at a high price: a smudge poorly removed by a substandard swab means taking the camera to a lab, where the service starts at 40 euros.
What follows is the kit we use at the counter when a customer brings in a camera for a quick check. Same materials, same brands, same prices you find online. No secrets, no "professional" products that are actually identical to those sold to amateur photographers.
Manual bellows: the first tool
The Giottos Rocket Blower large size, €12-15, is the de facto standard. Rocket shape, non-return valve that prevents re-suction of the dust just blown away, rigid nozzle that does not deform. Buy the large one (model AA1900), not the medium: the volume of air you deliver makes the difference.
Never use the compressed air cans sold for cleaning keyboards. They contain liquefied propellant that, if you tilt the can or spray for too long, comes out in droplets and leaves oily residues on the sensor glass. At that point, wet cleaning is no longer an option; it is a necessity.
Swab of the right size
Swabs are not cotton swabs. They are plastic spatulas with a non-abrasive fabric tip, sterile and individually pre-packaged. Reliable brands are VSGO and Photographic Solutions Sensor Swabs. A pack of 12 swabs costs 18-25 euros.
The size should be chosen based on the sensor format:
| Sensor format | Swab type | Width |
|---|---|---|
| Micro 4/3 (Olympus, Panasonic) | Type 1 | 12 mm |
| APS-C (Fujifilm, Sony, Canon, Nikon DX) | Type 2 | 16 mm |
| Full frame | Type 3 | 24 mm |
Using a swab smaller than the sensor means making two overlapping passes, which is where streaks occur. A larger one won't fit. The right size covers the sensor in a single, clean pass.
Cleaning fluid: Eclipse or equivalent only
The Eclipse Optic Cleaning Fluid by Photographic Solutions is 99.9% ultra-pure isopropyl alcohol, costing 12-15 euros for a 60 ml bottle that lasts two years. It evaporates in two seconds without leaving any residue. Two drops per swab are sufficient.
Never use distilled water: it evaporates too slowly and leaves limescale streaks if it is not truly distilled. Never use pharmacy alcohol: it contains denaturants and fragrances that deposit on the glass. The anti-aliasing coating on the sensor is delicate, and generic products will dull it.
LED Loupe for Inspection
The Carson SensorMag 4x with integrated lighting costs 35-45 euros. Without an illuminated magnifying lens, you only see large spots and end up performing three wet cleanings when one would have been enough. With the loupe, you locate the speck, remove it, and verify. It is the tool that separates approximate cleaning from a job done right.
If you are putting this kit together because you just bought a second-hand camera and want to know what to check, also read the 5 mistakes to avoid when buying a used camera: a dirty sensor is one of the signs that sellers often downplay.
Dry cleaning: the bellows, step by step
60% of the sensors we see arriving in the lab, dirty, can be cleaned without touching anything. Just air, moved the right way. Before opening a bottle of Eclipse or tossing a €4 swab, always try the air blower: if the dust is recent and resting on the AA glass, it flies off at the first hit.
The basic rule is simple. No compressed air cans, no workshop compressors, no breath. Only a manual rubber blower, such as a Giottos Rocket or an equivalent costing 10-15 euros. The pressure is low and controlled, and there is no liquid propellant that could splash onto the sensor.
Preparation: environment and battery
Work in a closed room with boarded-up windows and fans turned off. Air currents bring in new dust just as you are trying to remove it. If you have pets, change rooms: cat hair is a nuisance, light and static, it sticks to the sensor immediately.
Check the battery before you start. Below 50%, many cameras refuse to enter Sensor Cleaning mode, as a blockage mid-operation with the mirror up and shutter open may require service intervention. Always charge above half.
Remove the lens and activate the option from the menu, usually under Setup or Spanner: Manual Sensor Cleaning or Sensor Cleaning. The mirror flips up, and the shutter opens. On mirrorless cameras, it is even more direct: the sensor is already exposed, so just remove the cap.
Keep the camera upside down
Turn the camera body with the mount facing down. Lens pointing down, sensor exposed towards the floor. This is the fundamental position: the dust you blow off falls out of the camera due to gravity, instead of bouncing off the internal walls and settling back onto the glass.
Hold the camera steady with one hand and the bellows in the other. Do not place it face down on the table: if the surface is not perfectly clean, you risk touching the curtains or the sensor.
Three or four distinct puffs, never inside the camera
Bring the bellows tip close to the mount opening, but without entering. The nozzle stays outside, a couple of centimeters from the mount plane. Three or four decisive pumps, not twenty timid ones. Short, strong bursts dislodge dust better than constant pressure.
- Never blow with your mouth: breath carries moisture and micro-saliva droplets, leaving streaks that are difficult to remove even with Eclipse.
- Never use air dusters: the liquid propellant can exit the nozzle and freeze the front element or leave oily residues.
- Never use cheap static brushes: they electrically charge the sensor and attract more dust as soon as you remount the lens.
Reattach the lens, take a test shot at f/16 on a uniform white surface, and check the result. If you still see two or three stubborn dark spots, it’s time to move on to wet cleaning.
Wet cleaning with swabs: when and how
When the blower has been used three times and the spot in the sky test is still there, it's time for the swab. Not before. Wet cleaning is a direct contact intervention on the low-pass filter: it must be done methodically, not impulsively.
When the bellows isn't enough
There are three types of dirt that the bellows never removes:
- Greasy dust: particles that have adhered to the filter due to humidity or static microelectricity. They remain fixed even with close-range air jets.
- Shutter oil residue: small, dark, round spots with sharp edges. Common on early production Sony A7 Mark II (550-580 euros in our used stock), where the shutter mechanism sprayed micro-droplets during the first 30,000 shutter count. On the Fujifilm X-T1 (380 euros), the issue is almost non-existent, but residue can occasionally be found after long storage periods.
- Dried water splashes: circular halos left by an evaporated droplet. Typical after changing lenses in light rain.
Two drops of Eclipse, never more
Dampen the swab; do not soak it. Apply two drops of Eclipse fluid to the tip, one on each side. If the liquid runs down the swab or forms a visible puddle, you have used too much: discard the swab and start over. Excess liquid leaves radial streaks that worsen the initial problem.
Wait five seconds before bringing the swab to the sensor. The fluid must soak the pad, not drip.
One pass, from left to right
Constant and light pressure, as if you were drawing a line with a pencil on tracing paper. From left to right, in a single continuous motion. No back-and-forth, no rubbing, no pauses.
If the first pass isn't enough, flip the swab to the clean side and make a second return pass, from right to left. Never use the same swab for more than two passes. The pad collects dust, and if you reuse it, you drag it across the filter like sandpaper.
Verify with a new sky test
Immediately after, remount a lens and repeat the test at f/16 on a uniform white surface. Three possible scenarios:
- Clean sensor: no visible spots. You're done.
- Various residual spots: you removed the old ones but new ones appeared (rare). New swab, new pass.
- Visible streaks: you used too much liquid or reused the swab. Use a new, clean swab, never recycled. Try again with a single drop of Eclipse instead of two.
Discard the used swab. It costs two euros; the sensor costs two thousand.
Differences between mirrorless and DSLR in cleaning
The practical difference is simple: on a mirrorless camera, you can see the sensor as soon as you detach the lens, whereas on a DSLR, the mirror hides it. It may seem like a minor detail, but it changes the entire cleaning routine, both in terms of frequency and technique. A Sony or a Canon RF requires much more frequent maintenance than an older EOS 5D Mark III, assuming the same usage.
Mirrorless: sensor exposed when changing the lens
On any mirrorless — Sony E, Canon RF, Nikon Z, Fujifilm X, micro 4/3 — when you unscrew the lens, the sensor is right there, a centimeter from the air. Every lens change is an opportunity for dust, textile fibers, and microdroplets of humidity to settle directly on the low-pass filter. The APS-C entry-level models we sell suffer from this just as much as full-frame bodies: the Sony ZV-E10 at 500 euros, the Nikon Z30 at 450 euros, and the Canon EOS R100 at 400 euros all have their sensors completely exposed when the lens is detached from the mount.
Some manufacturers have added a small help: the Canon EOS R and the Sony A7 IV close the shutter when powered off, creating a physical barrier. It is not a perfect solution — the shutter blades are fragile and should never be touched — but it significantly reduces dust during lens changes. Models like the Sony A6100 at 600 euros do not have this feature: the sensor remains exposed and that is it. If you are considering your first purchase in this category, we have written a dedicated guide on how to choose your first used mirrorless where we also explore this aspect in depth.
DSLR: the mirror protects, but not the sensor
On DSLRs, the sensor is exposed only at two moments: during the shutter count (a fraction of a second) and in Live View mode. For the rest of the time, the reflex mirror and the shutter completely cover it. The result is that a well-maintained DSLR accumulates dust on the sensor much more slowly. The downside is that when you need to clean it, you have a more awkward workspace: the mirror must be locked in the raised position via the menu ("sensor cleaning" mode), and you have to insert the swab through the mirror box, with less light and less visibility compared to a mirrorless camera.
Lens change prevention strategy
- Camera always off: the active sensor is electrostatically charged and attracts dust.
- Mount facing down: gravity works in your favor.
- New lens ready in hand: the swap should take 3 seconds, not 30.
- Closed and still environment: never on the beach, never against the wind, never in light rain.
- Lens rear cap and body cap: put them back immediately, don't leave them open in your backpack.
In our workshop, we see mirrorless cameras with visible spots after just six months of tourist use, while DSLRs from the 2010s remain clean. It’s not a matter of build quality: it’s the design.
Common mistakes I've seen at the lab
Every month, at least one camera arrives at our workshop with a scratched sensor due to a DIY cleaning attempt. I'm not exaggerating: I keep a small log to understand what to protect our customers from, and the four mistakes below account for 90% of the cases we see.
Cotton swabs, microfiber cloths, tissues
The sensor is not a lens. The low-pass filter covering it is a glass sandwich with anti-reflective and anti-aliasing coatings that scratches under minimal pressure. Cotton swabs release fibers that stick due to static electricity, microfiber cloths drag abrasive particles, and tissues contain surfactants that leave halos visible at f/16. On an Olympus OM-D E-M1 mark II worth 600 euros that arrived at our shop a few weeks ago, the owner had used a cloth bought at a supermarket: two diagonal lines on the filter, irreparable. The camera was sold at a discount with the defect disclosed.
Compressed air dusters
They are the classic "I did it with a PC, why not on the sensor?" case. The propellants inside the canisters (HFC-152a, HFO-1234ze) exit at room temperature, but as they cool during expansion, they can emerge in a liquid phase and freeze on the sensor, leaving residues that become visible once they evaporate. Furthermore, the flow is too violent and can push dust under the filter or into the shutter mechanism. Never, under any circumstances. The manual blower exists for a reason.
Swab of the wrong size
A typical mistake made by those buying a generic kit online. A 24mm full-frame swab on a Panasonic Lumix G90 at 450 euros does not work: the Micro 4/3 sensor is 17.3x13mm and requires a 12mm swab. The 24mm one bends against the walls of the sensor well, releasing fibers exactly where you don't want them. The same applies in reverse: a 16mm APS-C swab on a full-frame camera leaves the corners dirty and forces you to repeat the process.
Unnecessary repeated cleanings
Every swab pass is a controlled but still present mechanical stress. Cleaning the sensor "just in case" before every service accelerates coating wear. The sensor should only be cleaned when the f/16 test reveals actual spots, not out of habit. The same logic applies before buying used: it is better to verify before cleaning, as I explain in 5 mistakes to avoid when buying a used camera.
When to take it to a lab (and what it costs)
There are three situations where DIY cleaning is not enough: oil stains that keep coming back, scratches on the low-pass filter, and dirt that remains after three swab passes. In these cases, persisting at home makes the problem worse. The sensor is a layer of glass just a few microns thick above the silicon: a poorly removed smudge becomes a permanent halo, and a scratch cannot be recovered in any way.
Oil on the shutter: a classic first-generation Sony A7 case
The first-generation Sony A7 and A7R are known for oil spots. The issue is not the sensor: it is the mechanical shutter that, at high shutter counts, releases microparticles of lubricant that deposit in the top right of the frame. You can recognize them because they are round and slightly blurred spots, always in the same position, and they reappear after a few hundred shutter counts even if you just cleaned it.
Wiping them with swabs does little: they come back. The real solution is disassembling the shutter, degreasing, and relubricating with oil in the correct quantities. On the Sony A7 Mark II (550-580 euros in our catalog) the issue is significantly reduced compared to the first series, but on a unit with 80,000+ shutter count it is worth checking. It is a 100-150 euro intervention that restores a clean camera body for years of further use.
Scratched sensor: limits of recovery
A scratch on the AA filter is visible at all apertures, not just f/16. It appears as a constant thin line, often caused by using a swab of the wrong size or passing it twice over a hard particle. It cannot be polished or removed: the entire filter must be replaced. On an entry-level APS-C camera, the cost is €200-250; on a full-frame camera, it can rise to €350-400 plus labor. For many camera bodies under €600, the repair is not economically viable.
What we do in the ReflexMania lab
Every camera entering our used inventory undergoes a complete inspection before being displayed. We offer the same service to those who bring us their own camera:
- Professional sensor cleaning: certified swabs, Eclipse fluid, inspection with 7x loupe. 40-60 euros depending on the format.
- Shutter check: reading of the real shutter count and stability test at fast speeds.
- Diopter and viewfinder verification: eyepiece cleaning and calibration if necessary.
- Resolution test: shot on an optical target to verify that the sensor has no hot pixels or localized defects.
The point of bringing it to the lab isn't just to avoid the risk of damaging it: it's to get a complete diagnosis. If that spot you've been chasing for weeks is actually a shutter issue, you'll find out immediately and won't waste 50 euros on swabs.
Frequently Asked Questions
Can I use pharmacy-grade isopropyl alcohol to clean the sensor?
No. The isopropyl alcohol from the pharmacy contains impurities and often water, which leave streaks on the AA filter. Eclipse Optic Cleaning Fluid is 99.9% isopropyl alcohol certified for optics. It costs 12-15 euros for 60ml, which lasts for years.
How often should the sensor of a mirrorless camera be cleaned?
There is no fixed frequency. Clean it when the f/16 test shows spots that bother you. A landscape photographer who often uses f/11-f/22 may clean it every 2-3 months. Someone who always shoots at f/2.8 might go years without noticing the dust.
Does the camera's automatic cleaning replace manual cleaning?
Only to a certain extent. The ultrasonic systems from Olympus and Panasonic effectively remove dry dust, while other brands are less effective. No integrated system removes greasy dust, oil residues, or splashes: in these cases, manual intervention or a laboratory service is always required.
Can I damage the sensor by cleaning it improperly?
Yes, especially with the wrong size swab, non-dedicated products, or excessive pressure. The most common damage is a scratch on the AA filter: at that point, replacement is required, costing 200-400 euros. If you have doubts about the first cleaning, have it inspected by a lab first.
Are ReflexMania cameras sold with a clean sensor?
Yes, every camera goes through our workshop before sale. Sensor cleaning, shutter count check, diopter verification, and a full functional test are included in the price, along with the 2-year warranty.
What to do if I see a spot that the blower cannot remove?
It is probably greasy dust or an oil residue. Proceed with a wet cleaning using a swab of the correct size and Eclipse fluid. If the spot remains after two passes, stop: continuing risks making it worse. Take the camera to a lab.
Is changing lenses outdoors really that risky?
It depends on the environment. In a closed room, the risk is minimal. Outdoors, against the wind, on the beach, or in dusty environments, dirt inevitably gets in. Keep the camera body turned off (on models with a protective shutter) and upside down during the lens change.
Dirty sensor or camera needing service? Talk to our workshop
If you have questions about a purchase or need advice for your specific case, contact us. We offer free advice because we are photographers first, sellers second, and because a customer who makes a poor purchase decision will not return to photography.
Three ways to get in touch:
- Contact form — response within 24 business hours
- WhatsApp at 342 362 3454 (messages only)
- Phone: 071 291 6347 (Mon-Fri 9-13/15-18, Sat 9-13)
And if you want to see what we have in stock right away, explore the available used gear today: every camera is certified, comes with a 2-year warranty, and ships within 24-48 hours.
Article written by Matteo for the ReflexMania Team. Last updated: May 2026. Prices and availability refer to the time of publication.